Initial Flight Planning
Begin the navigation plan by drawing a straight line on the sectional chart between the departure and destination airports. Examine the route of flight for terrain, obstructions, and alternate airports. Check the route for any airspace you need to go around, such as restricted or prohibited airspace.
Next, find a prominent visual landmark about five miles or so from your departure airport, which is along your route of flight. This first visual checkpoint will allow you to transition from the departure airport's traffic pattern and become established on your route of flight.
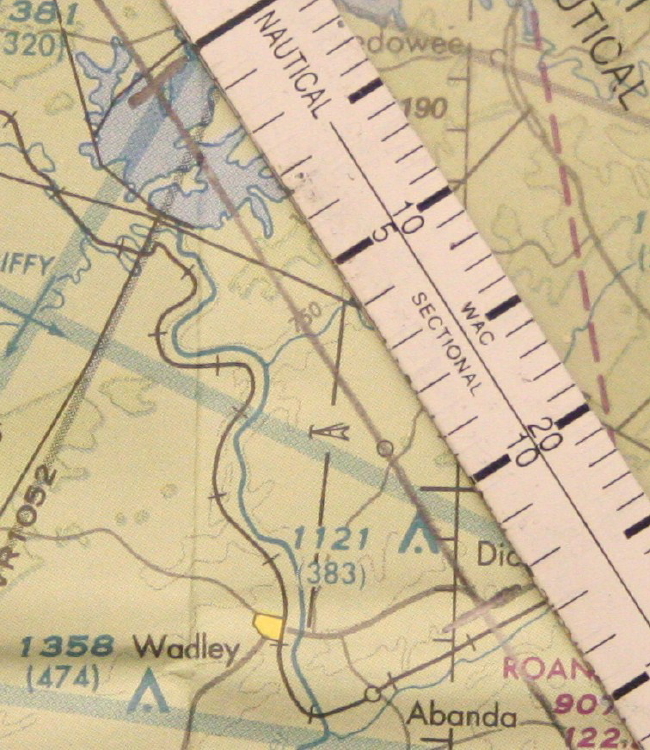
Continue finding visual checkpoints every ten or fifteen miles along your route of flight all the way to the destination. In the example below, the course between the Anniston airport (ANB) and Chambers airport (7A3) has been drawn, and pilotage checkpoints have been determined every approximately ten miles.

Below it can be seen that two of the checkpoints selected were the point where we begin to cross a large lake and the road between Roanoke and Wadley. These checkpoints will be easily visible to us enroute.
When using roads, rivers, power lines, railroad tracks, etc. as visual checkpoints, it is better if they run more perpendicular to your course than more parallel. If they were to run closer to parallel to your course, it would make it difficult to determine when you were at the checkpoint, since a slight course deviation left or right could cause you to think you were at your checkpoint several minutes earlier or later than you actually were. Crossing such a visual checkpoint which runs perpendicular to your course gives you a more definite crossing time, even if you are slightly left or right of your intended course.
Note: When using plotters to measure distances, such as the one shown in the photos, always check to make sure the scale on the plotter matches the chart used. Notice below, the scale marked "sectional" is used, showing 12 NM between the lake and road checkpoints we created. Our planning would be way off if we accidentally used the "WAC" (World Aeronautical Chart) scale.
Finding the True Course
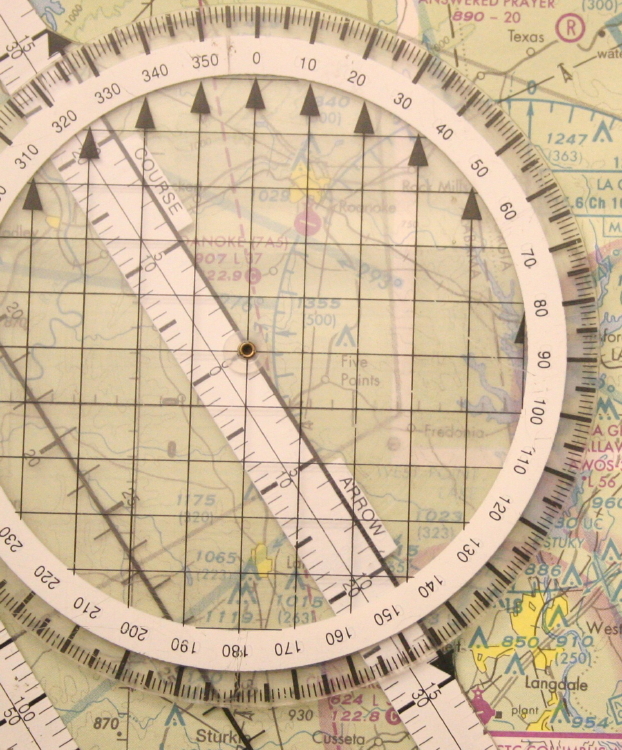
Using a plotter or protractor and sectional chart, find the true course to your destination airport. To do this, find the angular difference between your route of flight and lines of latitude or longitude shown on the sectional chart.
We use a compass to fly a certain heading to keep us on our course, which is the path we intend to fly over the ground. During flight planning, the compass heading to follow will be estimated. In order to do this, we begin with true course, which is the path we intend to fly in relation to true north (the north pole). Since maps are drawn in relation to true north, the chart shows us true course. As shown below, the use of a plotter indicates a true course of 146 degrees.
There are a few different styles of plotters available, but the idea is the same. The longitude and latitude markings on the sectional chart are used as a guide, and the angle is compared to the course line we drew on the map, giving the true course.
Check yourself to make sure the true course you come up with generally makes sense. North, East, South, and West are 360, 090, 180, and 270 degrees, respectively. Our planned flight is southeasterly in direction. The true course we came up with, 146 degrees, is indeed between south and east.
Add the true course to the flight log.
Determine the Cruising Altitude
Select your cruising altitude based on aircraft performance, winds aloft, cloud heights, and aeromedical factors. Additionally, the selected cruising altitude must meet the minimum altitude and direction of flight requirements of FAR 91.
For the example, we'll plan on 3,500 MSL for a cruising altitude.
Determine the Climb Performance
Determine the estimated time, fuel burn, and airspeed in the climb from the airplane handbook's performance section. Using the winds and temperatures aloft forecast and your flight computer, calculate the wind correction angle and groundspeed for the climb phase of the flight.
We'll say we looked at that and found we will our climb to 3,500 feet will cover 6 miles, take 5 minutes, and burn 0.75 gallons. Mark the top of climb point on the chart for reference. Also, place the top of climb point into the flight log.